
30
AprIn the previous posts, we configured dynamic attributes and connected them to a product using product classifications. Now let’s go one step further: we’ll make one of those attributes actually impact price.
Scenario: Configurable Office Chair with Price-Driven Options
We’re selling an ergonomic office chair, and customers can configure it based on two attributes — both of which impact pricing.
Chair Configuration Attributes
| Attribute | Values | Price Impact |
|---|---|---|
| Seat Material | Mesh, Eco Fabric, Leather | $0, +$70, +$120 |
| Foam Density | Standard, High-Density, Memory Foam | $0, +$90, +$150 |
Each unique combination of these attributes creates a different total price.
Once you’ve defined your picklists, attributes, and product classification, and assigned the classification to your product (as covered in earlier posts), you're ready to make your attributes price-impacting and connect them to pricing logic.
Here’s how that flow looks:

Let’s continue by enabling the attributes for pricing and configuring the necessary price adjustments.
Mark Product Classification Attributes as Price Impacting
Go to the Product Classification you've already created (e.g., Office Chair Configuration), then:
-
Click into the Attributes related list.
-
For each relevant Product Classification Attribute (e.g., Seat Material, Foam Density), click Edit.
-
Check the box for “Is Price Impacting”.
-
Save.
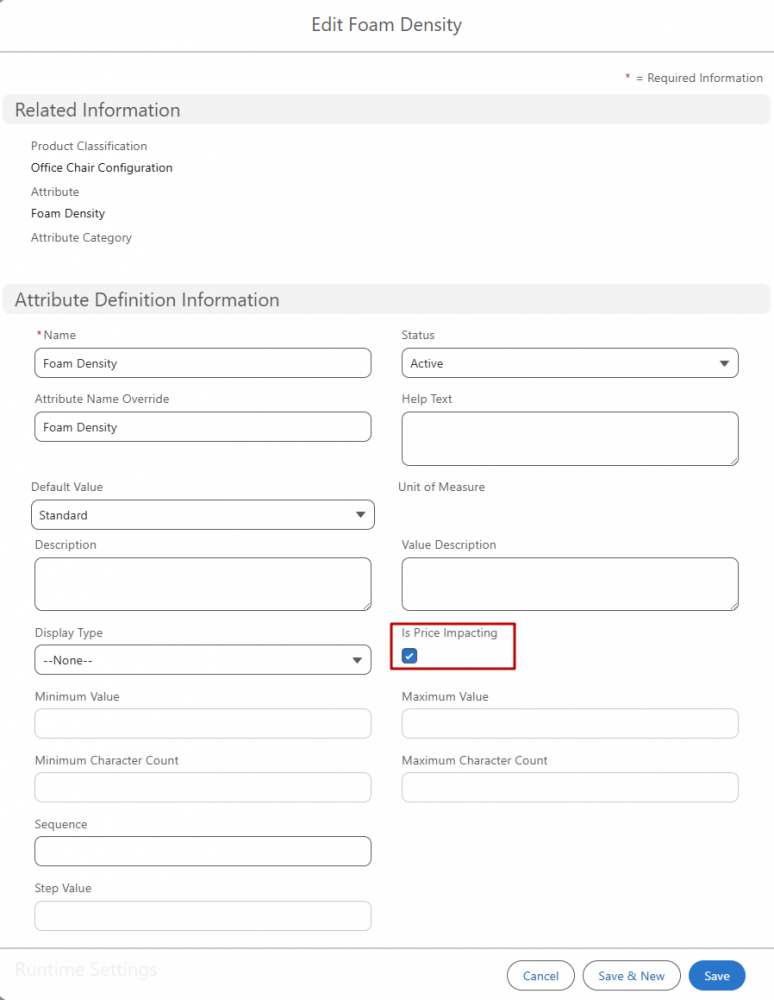
This tells Revenue Cloud that these attributes should be evaluated by the pricing engine.
Create Attribute-Based Adjustments
First, Go to the Price Management App, then open Price Adjustment Schedules.
You’ll see a list of predefined schedules that come with Salesforce Pricing:
- Standard Attribute-Based Adjustment
- Standard Bundle-Based Adjustment
- Standard Price Adjustment Tier
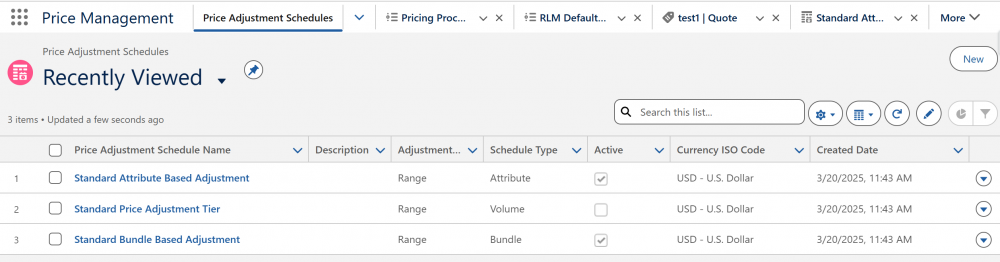
We’ll use Standard Attribute-Based Adjustment, which lets you define price changes based on product attribute selections.
Each combination of attributes that changes price requires its own Attribute-Based Adjustment record. Let’s walk through one together.
Example: Mesh + Standard Foam (baseline)
- Product: Office Chair
- Adjustment Type: Amount
- Adjustment Value: $0
- Effective From: (Set the start date)
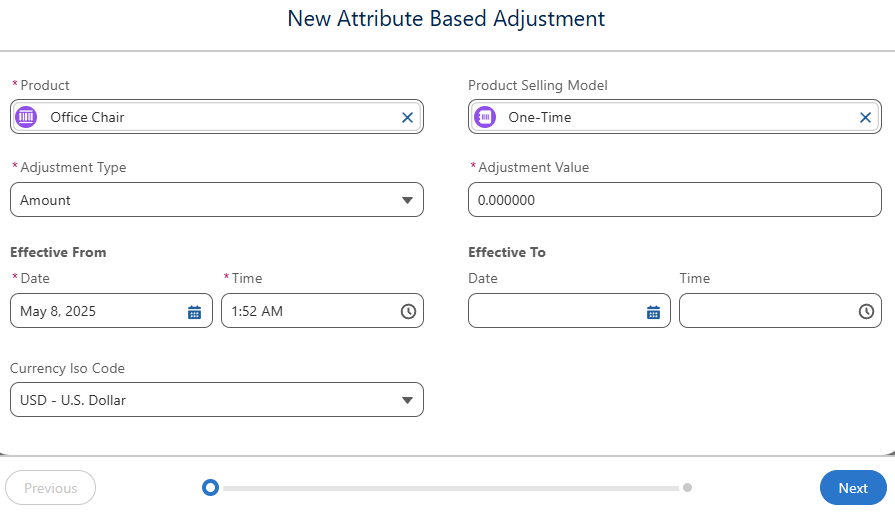
Click Next, then define your conditions:
- Seat Material = Mesh
- Foam Density = Standard

Note that you need to define values for all price-impacting attributes in every adjustment record — even if only one attribute drives the price.
Click Save.
Repeat for the remaining 8 combinations. Note: In Salesforce Pricing, if a price adjustment increases the product price (like adding $120 for leather), the adjustment value should be negative. If it reduces the price (like a discount), the value should be positive.
| Seat Material | Foam Density | Total Price Adjustment |
|---|---|---|
| Mesh | High-Density | -$90 |
| Mesh | Memory Foam | -$150 |
| Eco Fabric | Standard | -$70 |
| Eco Fabric | High-Density | -$160 |
| Eco Fabric | Memory Foam | -$220 |
| Leather | Standard | -$120 |
| Leather | High-Density | -$210 |
| Leather | Memory Foam | -$270 |
Sync Pricing and Test
Once all adjustments are created:
-
Go to Setup → Salesforce Pricing Setup
-
Click Sync next to Sync Pricing Data
-
Wait a few minutes for the sync to complete

Now open a quote, add the Office Chair, and launch the Configurator with Instant Pricing enabled.
Select different attribute combinations (e.g., Leather + Memory Foam) and watch the unit price update based on the logic you’ve configured.
This is how using price-impacting attributes lets you build more intelligent pricing strategies into your configurations.
Comments (0)